Showing posts with label fabric. Show all posts

Friday, 14 August 2015

.: Me and My Sister class! :.

I recently went to an awesome class at Patches Indooroopilly.  It was with Barb and Mary from Me and My Sister Designs.  My class was the Slice of Cake 2 pattern - I've finished 11 blocks now, and am thinking of sewing a few more and including them in my girls' quilts rather than making them into their own quilt.  


It was a really fun day, with LOTS of fun giveaways thanks to Moda, Di Mill (a Moda rep in Australia, and the wonderful lady who coordinated Barb and Mary's trip) and Barb and Mary.  I won a gorgeous FQ bundle, and we all came away with at least two extra patterns.  I've already made a little something from the Buttons Jars pattern (pic below of Barb and Mary's cute Buttons Jar quilt), but can't share it yet as it's a secret pressie!


I went along to Barb and Mary's trunk show as well, and it was a lot of fun.  It was great to hear the stories behind their happy + gorgeous quilts, and to share in a lovely evening of quilt-love, snacks and champagne and even more prizes.


Barb and Mary have already blogged about their Australian adventures here and here - click through and have a read (and click here for a pic of me and Peta in the class, wahoo!).


Here's a pic of the bundle I won, the patterns and the sweetest little beaded scissor-charm we each got to make during the class.

{too cute, I say!}
And now I will leave you to scroll through all the rest of the blocks I've made so far.  I had to fussy-cut all the tiny centres - because I'm incapable of NOT fussy-cutting all the tiny centres ;-)  Please sing out if you'd like to know any fabric details from any of the blocks I've made, and I'll let you know, in the comments or by email.


Too much fun, do you agree?  Me too.  Happy weekend to you all.  xoxo cat

Wednesday, 20 May 2015

.: Bloggers' Quilt Festival - True North Mini :.

Amy Ellis is very kindly spreading the virtual quilting love once again, by hosting the first of her two annual online quilt festivals.  It's just been Spring Quilt Market in Minneapolis, and so Amy's Creative Side Bloggers' Quilt Festival has been running all week, so that we can all celebrate quilting everywhere, not just in Minneapolis! - super lucky for me, since Brisbane and Minneapolis are thousands of kilometres apart, plus a very long time on a couple of planes.

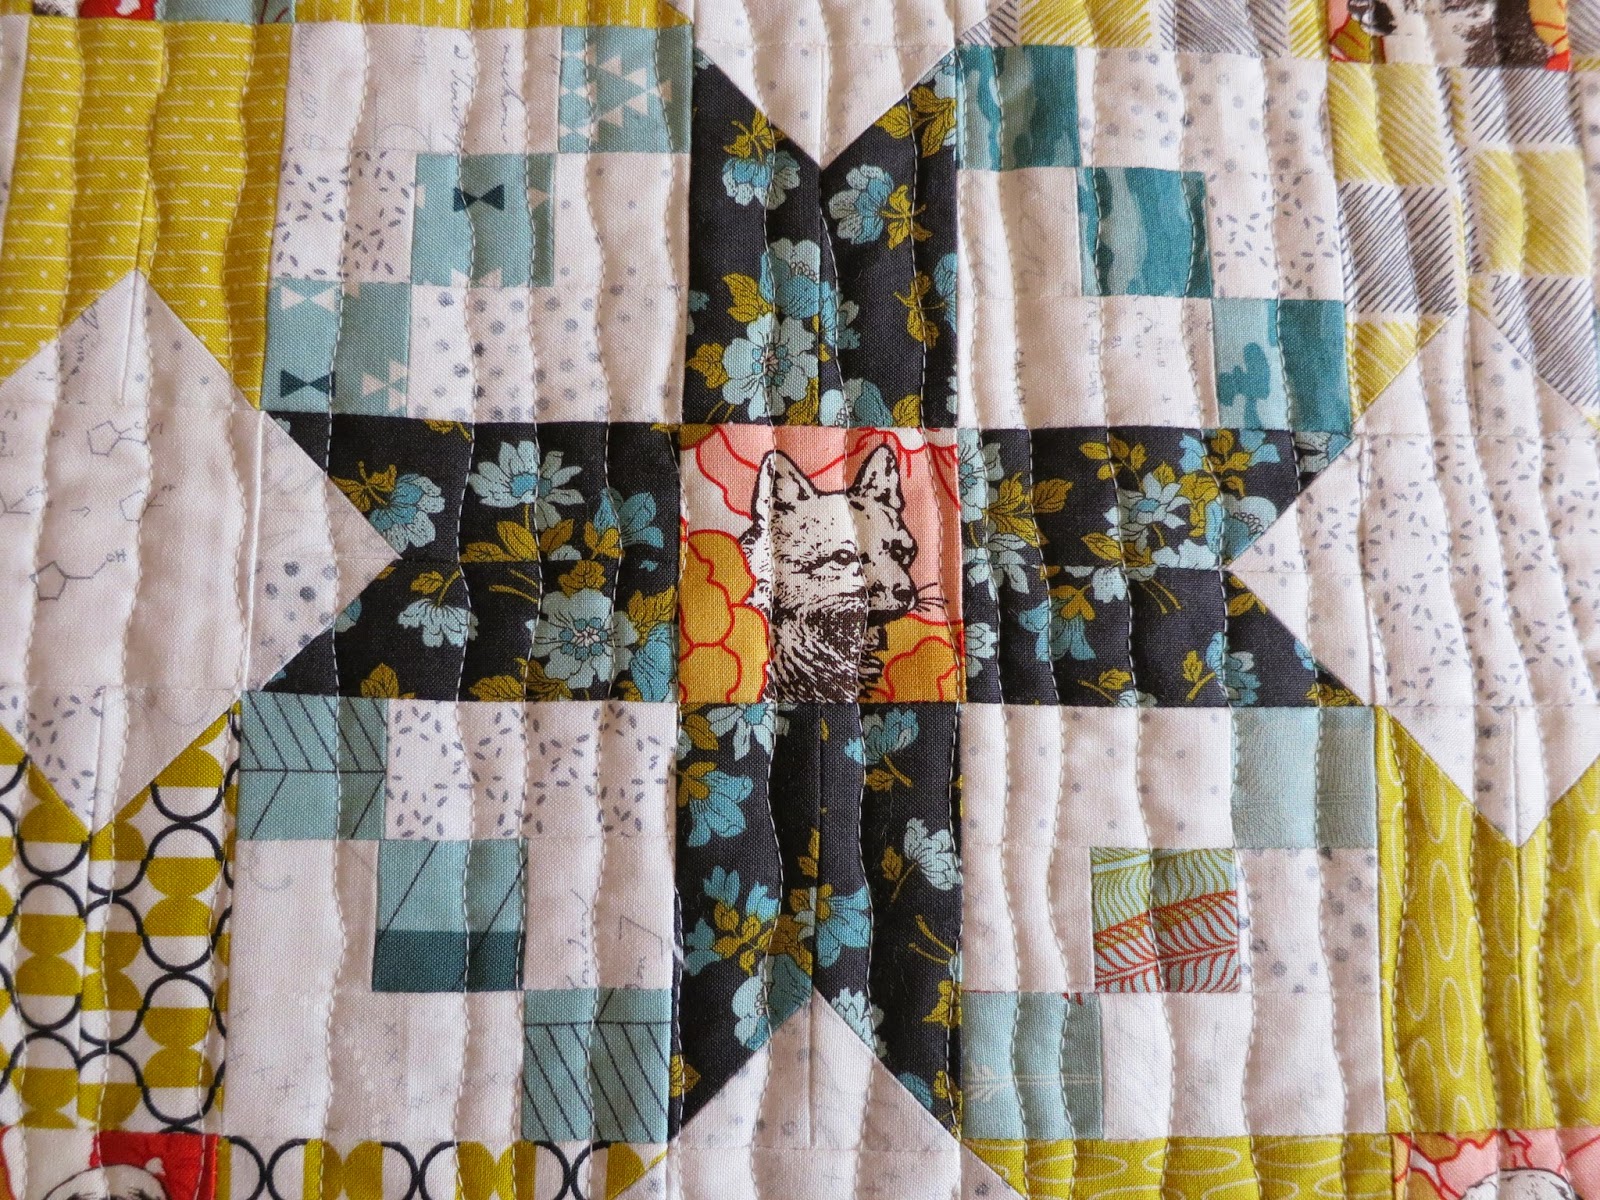
I'm entering my True North mini into the Mini Quilts category.  The patten is by Peta from She Quilts a Lot - there's a full-size version in Peta's shop as well.  There are some gorgeous True North quilts on instagram, if you take a look through #truenorthquilt.


My mini has mix of gorgeous Moda fabrics from fat-quarter bundles.  I normally sew much more scrappily - so it was a different experience to sew from just three different fabric lines.  I think the world may stop turning if I ever sewed from just one!


The fussy-cut animals and all the blues are from Urban Chiks' Nomad.  The citron yellows are from Amy Ellis' Chic Neutrals, and the backgrounds are from Modern Background - Paper by Zen Chic.  I think they all play really well together, and I absolutely love how my mini has turned out.


The quilting is my very favourite organic lines - it's my all-time quilting favourite because by adding 'organic' to 'lines', there can be no mistakes ever!


Peta has written a great pattern, it sews together really quickly.  I love the nifty little faux nine-patches for the star corners.


The Nomad animals are so sweet - I think it's my favourite print in the range - though I also love the navy flowers and the pale blue feathers in the pic below.


For the back, I've used a favourite print from Moda - Erin Michael's Lush Uptown - have you seen Erin's new line Purebred, which was released at Quilt Market over the weekend? Love it already.


This little mini is headed to my little desk in the corner, to be a mat for my laptop.  It measures 18" x 18", so it's the perfect size.


Happy Spring Bloggers' Festival everyone.  There are some really gorgeous entries already, please go check them out over a cup of tea.  Have a great day.  xoxo cat

Monday, 20 April 2015

.: Cotton + Steel Giant Vintage Star quilt - wahoo! :.

Another quilt finished! - this is my Cotton + Steel Giant Vintage Star quilt, made from the super quick and straightforward tutorial by Jeni Baker.


I made it for two reasons - one, because I loved all the Giant Vintage Stars I've seen all over the internet, and two, to use a few of the Cotton + Steel fat quarters that I've been slowly accumulating thanks to the Pink Castle Cotton + Steel club.


The star is all made of Cotton + Steel fabrics, and the background is made from different favourite low volume fabrics - with just the sweet blue C + S tigers sneaking in on the bottom right - I just realised there's a whole little cat line-up going on there too, with Lizzy House's Catnap cats, and C+S lions and tigers, oh my.


I took the quilt with us down to Lennox Head for a few days, so I could do a little binding by the beach.


I even finished the binding in time to take a few photos on the beach on Saturday afternoon - but the steady easterly and late afternoon sun meant that they were not quite the relaxed, arty, beachy quilt pics I was hoping for - so we quickly took a few more in the backyard this afternoon. 


These next two pics came out great, since the quilt was safely folded and not snapping in the wind like a sail, ready to take off over the water.


I pieced the back out of a few more favourite low volume fabrics.


The binding is the same Dear Stella navy confetti print I used on my Bob Box


Kelly from The Quilt Machine did the quilting, and chose a really great edge-to-edge design that really complements the quilt, I love it. 


I'll definitely make another Giant Vintage Star - it's such a great pattern for highlighting some favourite fabrics - both in the star and background - and it sews together so very quickly.  I think next time I'll add a border to make it just a little bigger for a single bed.  This one is already living happily on the lounge.

Back to school for everyone in Queensland today.  Hope you've had a relaxing school holiday, and are ready for an awesome week.  xoxo cat

Monday, 16 March 2015

.: Bust-A-Kiss block - our first blogtorial :.

February was Jodi's month in our Care Circle of doGoodStitches - and as February was also QuiltCon month, I ran a little behind in sewing my blocks.  Jodi had asked for improv blocks, using rainbow colours - all the rainbow colours + navy + pink - with a low volume background.  I had no real plan in mind for Jodi's blocks when I started, but I did have Rachel and her baby Eleni on my mind, and ended up with wonky, scrappy, rainbow kisses/x's.


When I shared the blocks on instagram, a couple of lovely people asked me if there was a pattern for the kisses/x's - so I thought I'd have a go at my first-ever tutorial for the blog - or as my husband has been calling it - a "blogtorial"!  I figured the block needed a name that was a little more catchy than rainbow-scrappy-kiss/x, so after a little pondering and a glass of wine, came up with 'Bust-a-Kiss' - as these x (or 'kiss') blocks are perfect for scrap-busting - are you with me?  I'm hoping you've now also got Young MC's 'Bust-A-Move' in your head, ready to sing out loud while busting through your scraps.

So - this blogtorial is to make one 12.5 inch block.  I 'sew big and trim down', so there's plenty of wriggle-room for fabric-placement - this may not be your way of sewing - see how you go - your blocks could end up a little bigger, which is a nice bonus!

1. Start with a 12.5 " square of low volume fabric - you can create a piece of fabric by sewing together some low volume scraps, or just use a single piece of fabric. I've sewn four blocks - three with scrappy low volume backgrounds, and one single-fabric background.


2.  Piece together two bust-a-scrap strips measuring 2.5 " x 18.5 " - this length gives you plenty of fabric to work with so you can trim down later, remembering my whole 'sew big, trim down' philosophy of sewing (which others may call 'don't bother measuring too carefully' or 'she wastes fabric' ... but I figure this is a great scap-busting project, so you'll be sewing from your scraps anyway).


3. Slice your low volume background square in half on the diagonal - either diagonal is fine.


4. Pin and sew a bust-a-scrap strip to one of your low volume background triangles.


5. Iron your seam towards the bust-a-scrap strip.


6. With right-sides together, lay your remaining low-volume background triangle on top of your sewn-piece, roughly making sure that the corners line up - I would never normally actually check that the corners are exactly in line, I would just eye-ball it, but for the sake of the blogtorial, I wanted to be sure you knew what I meant (the numbers on the ruler in the pic don't mean anything, the ruler is just to show you the corners are in line!).


7. Sew together, and iron your seam towards the bust-a-scrap strip.  I should mention at this point too, that I rarely sew with solids - and take a look at that awesome green! - a solid!


8. At this point, you can trim up your square a little if you like - down to 12.5 " if you like - but you don't have to.  I have trimmed my square to 12.5" for this step, just so you know - and just a little tip for you when you are trimming, make sure the corners of your 12.5 " square ruler (or whichever ruler you are using) are centred in the middle of your bust-a-scrap strip, so your kiss-corners are even-ish.  Slice your square in half on the diagonal, as shown in the pic below, cutting straight through your bust-a-scrap strip.


9. Pin your second bust-a-scrap strip in place and sew, again ironing the seam towards the strip.  If you had trimmed your square to 12.5", the strip will overlap the ends of your low-volume background triangle.  If you had not trimmed down, the strip will not quite reach the ends of your low-volume background triangle - so just centre it as best you can.


10. OK last step - lay your remaining background piece right-sides-together on top of the piece you have just sewn, taking care that the bust-a-scrap strips line up, as shown in this pic - see how I've folded-back the top-piece, so you can see that the strips are lining up?


11. And oh look! - you've made a Bust-A-Kiss block!  - trim it back to 12.5 " square (see the little trimming-tip in step 8 above).  Here are the four finished blocks I made to share with you.  The blocks are the perfect size for a pot-holder - or they'll make a very gorgeous quilt if you keep on going - see how the joins in the kisses all meet up? - cute!


I'll be back soon to share what I've sewn these blocks into - I haven't yet decided on a mini or potholders or whether I'll add them into my AusModBee + Sew Sisters quilt.  Happy Monday!  xoxo cat

Friday, 27 February 2015

.: Australia! tote :.

Remember this?  I made it into a tote bag and took it to QuiltCon!


So it's been to Austin and home again, and it carried a LOT of awesome stuff while in Texas - all sorts of QuiltCon goodies + Austin souveniers.  Lots of people noticed that I had Australia on my bag, and I had fun showing them Peta's instagram page and saying that the pattern would be in Fat Quarterly - and also pointing out that each state was in a different colour - some people were pretty amazed that we only have seven states (I didn't get into the territories distinction with them, sorry ACT and NT ...).


So now I've shared the Sew Together Bags, and the Australia! tote bag that came to Austin with me it's getting time to share some pics and thoughts of what actually happened at QuiltCon, don't you think?  The weekend is looking good for that. 


'til then. xoxo cat
Related Posts Plugin for WordPress, Blogger...