Showing posts with label Farmers' Wife 1930s Sew-along. Show all posts

Thursday, 19 January 2017

.: Farmer's Wife sew-along block 91 Sarah :.

Here is Sarah. Sarah was the most straight-forward of all my Farmer's Wife tutorial blocks to sew - there is a not a y-seam in sight!


You can sew Sarah without foundation paper piecing or templates - I rotary cut all the pieces, and worked out the quilt-maths to make the HSTs and flying geese star points all by myself! - which is a pretty massive achievement, as quilt-maths and I are not friends. As you know, I cannot share the measurements here as it would breach the author's copyright - but if you can figure out the size of the corner squares, knowing that the unfinished block is 6 1/2" square, you'll be off and running.

If you would like a little quilt-maths help for the HSTs and flying geese (they provide a MUCH better explanation than any I could share here):
For HSTs - click through to Alyce's very helpful tutorial.
For flying geese - click through to this Quilter's Cache tutorial. Of the three different methods shown, I like their 'Speed Piecing Method A' the most.

So let's get started
As mentioned, there are three basic units needed to make Sarah:
1. Corner squares.
2. Half square triangles.
3. Flying geese (star points).

In keeping with Sarah in the book, I chose only three fabrics.  You will need:

Fabric A (navy lions)
1. Four corner squares.
2. Two HST squares.

Fabric B (low volume lemons + flowers)
1. Two HST squares.
2. Four flying geese bases.

Fabric C (orange)
1. Eight squares for flying geese star points.


Make your HST and flying geese units
Once you have cut all your fabrics, you will need to rule a diagonal line - I always just use a sharp pencil - on the back of all eight of your flying geese star point squares; and on the back of your two low volume HST squares.


To create your HST units, place your low volume + print squares RST, then sew 1/4" either side of your drawn line (refer to the pic below - you may need your glasses or to zoom in, as yes, I realise now it would have helped significantly if I had thought to use a higher-contrast thread for these tutorial photos).

To create your flying geese units, place one star point square on one flying geese base, with the diagonal drawn line running from a top corner to the bottom middle, as pictured below.  Sew directly on the drawn line.

Once you have sewn all your HST + flying geese lines:
- for the HST units, trim directly ON the drawn pencil line. You will have four HST units.  Iron the seam open.  Trim each HST unit to the same size as your four corner squares (the navy lions in my block).
- for the flying geese units, trim 1/4" from your sewn line, being sure that you are trimming off the small outer triangles and not the flying goose base (in the pic below, you would place your 1/4" ruler line directly on the sewn line, with the outer edge of the ruler running 1/4" from the sewn line down to the right underneath).  Iron your seams open.


Place your remaining four star point squares on the other end of your flying geese units, with the drawn line running from the top corner to the bottom middle, as shown in the pic below. Again sew directly on the drawn line.  Trim 1/4" from the sewn line, being sure to trim off only the small outer triangles. Iron your seams open.


Block layout + sewing it together
Lay out all the units of your block as they will appear in the finished block, taking particular care with any directional prints, and ensuring that the fabrics in your central HST pinwheel are correctly oriented.

Sew the HST pinwheel together - join the top squares + bottom squares - this is one of the few times I iron seams to either side, to make sure the seams nest nicely when sewing the pinwheel together.


Sew your corner squares to the top and bottom flying geese units - iron the seams to the corner squares.

Sew your flying geese units to the central HST pinwheel - iron the seams to the pinwheel.

Sew your three rows together, taking care to match up your seams.

You are done!  Here's a pic of Sarah on point - which will work equally well as squared, unless you are sewing with directional fabrics like I have :-)


Good luck with your Sarah - she is a dream to sew.

The book you will need for the Farmer's Wife sew-along is The Farmer's Wife 1930s Sampler Quilt: Inspiring Letters from Farm Women of the Great Depression and 99 quilt blocks that honour them by Laurie Aaron Hird for Fons & Porter/F+W; RRP $28.99 - click here to purchase.


For all information about the Farmer's Wife sew-along, please click through to Angie's GnomeAngel blog - she has a separate tab for all the Farmer's Wife info, as well as a whole heap of info for her 2017 sew-alongs - it's definitely worth taking the time to make a cup of tea and have a good read through everything.  And if you would like to sew Sarah using Marti's fabulous templates, please take a click through to Marti Michell's blog for all the info.

Thanks very much for joining me for all my Farmer's Wife tutorials - this is my last one! xoxo cat


SaveSaveSaveSave

Thursday, 22 December 2016

.: Farmer's Wife sew-along block 84 Posy :.


Hello Farmer's Wifers, it's Posy time.  I liked making Posy.  My last Farmer's Wife block tutorial was for block 87 Prudence, who is still no friend of mine.  Like Prudence, Posy involves y-seams but they are much gentler. Posy is definitely a much happier block to sew.

My tutorial is for foundation paper-piecing (FPP) Posy.  I created a FPP tutorial for block 1 Addie, and have decided to create nearly-a-full FPP tutorial for Posy too (there aren't as many step-by-step pics for Posy as there were for Addie, so please click through to Addie if you need more detailed info).

And if FPP + y-seams aren't your happy home, Angie has created an alternate block this week - I've included the link right at the bottom of this post :-)

Let's go.

Preparing to FPP
1. The first step is to print off your templates, being sure to have your printer set to 100% (or 'no scale'). Check the one-inch line with a quilting ruler.

2. Decide on your fabrics and colour in or label your block diagram and the corresponding template pieces, so you can keep track of which fabric to sew onto which template piece once they're all cut up and don't make a lot of sense - I forgot to take a block diagram + fabric choice pic of Posy, so see below for a pic of Prudence (so nice of past-Prudence to step up and show a bit of kindness).


3. Use paper scissors to cut out all your template sections, just roughly around the outside, there's no need to cut directly on the dotted outside edge (note that the solid line is the line on which you will sew, and the dotted line is the outside edge, with the seam allowance in between).

Time to join fabric to paper
4. Work through all your template sections, and glue the first fabric piece onto the first template piece. I use a swish of Sewline glue pen to glue the wrong side of the fabric to the unprinted side of the paper template.  To be sure you are gluing the fabric in the correct place, hold your paper template up to the light (a window or a light box if you have one) and position the first fabric piece over the first template piece, being sure to leave a 1/4" seam allowance around all edges of the template piece.

5. Work through all your template sections again, carefully pinning your second fabric piece in place.  Place your second fabric RST (right sides together) with your first piece, with at least a 1/4" seam allowance extending into the template's second piece.  Pin in place along the sew-line between the first and second template pieces, then flip your second fabric piece over to check that it covers the whole area plus seam allowance.

6. Take all your template sections to your sewing machine.  Set the stitch length to 18-20 stitches per inch for your machine - on my Bernina, it's 1.5. I sew all my FPP blocks with the Bernina 1/4" number 37 foot - you need an open-toe foot of some kind, so you can easily see where you are headed.

7. Sew directly on the printed sew line. Be sure to backstitch at the start and end of your sew line. For sew lines that start/finish within the block, be sure to start/stop directly on the sew line. For sew lines that start/stop on an external edge of the block, it's fine to sew into the seam allowance (doing this just makes removing your papers later a little more fiddly, but it makes your block a little more secure).


Trimming + ironing
8. Once you have sewed the second piece to the first piece on all your template sections, take the sections to your cutting mat and lay them fabric-side down, being sure that your fabric pieces are still RST, and haven't flipped over - you don't want to trim off the piece you have just sewed.  Fold template piece 2 down onto template piece 1, along the line you just sewed. Line the 1/4" line of your ruler directly along the fold line, and trim your seam allowance to 1/4".   Do this for all your section pieces, and then take them to the ironing board.

Note that for the trimming step of all FPP patterns, you will always fold down the bigger template number onto the smaller template number, to trim the seam allowance - so be sure to always follow the numbered piecing order. 

9. Flip over and press your second piece down flat - be sure to press down rather than swoosh the iron all about, so your fabric pieces don't shift.

10.  Repeat steps 1-9 until all your template sections are finished.

11. Once all your sections are finished, press them flat with the iron, then trim around the external edges, directly on the external section lines - refer to the pic below under step 12.

Joining sections together
12. Now to join the sections together. To be sure your template sections meet up correctly, place pins through external sew line meeting-points - refer to the pics below as an example (joining section A to section J).


13. I then pop a Wonder clip or two between my pins, so that the section pieces can't move.  Remove the pins + clips as you join each section together, sewing from paper-edge to paper-edge along the sew line.

As with all FPP patterns, follow the piecing order given in the book. 

Just note - when joining the little triangles J-Q, be sure that all the letters read the right way up, then flip the little triangle over to join to the bigger piece (e.g. K to B in the pic below - see how all the letters + numbers are running in the same direction).


Add extra pins along the sew line as needed, to help the sections meet accurately - see pic below, where I have added pins either side of A2, as well as on the outer corners. 


14. After you join each section to the next, iron the seams open - you can remove the paper within the  seam allowance at this point.


Joining corner sections to the middle sections R + S
15. Once you have finished sewing each template section, lay out your block next to your machine, with the paper-side facing upwards and the fabric facing downwards.  Check again that all the little triangles have the printed writing running up the correct way


16. It's y-seam time. Start on the paper-edge and sew along the long edge towards the smaller line (refer to the pic below, sewing S to AJ).  When you get to the y-intersection, exactly where the pin is:
- lower your needle
- lift your presser foot
- pivot the block
- lower your presser foot
- continue sewing along the smaller line to the paper-edge.

It totally works fine, I swear! - just go slow and steady.


Joining the top + bottom sections to I
17. Take care when joining the top and bottom sections to I, as the fabric on the outer tips will want to shift - I used my Sewline glue pen to swish glue on the outer tips of I1 and I3, to ensure the fabric did not lift away from the paper as I sewed.

18. I'm not the world's best y-seam sew-er, so to make life easy, I started right in the middle of I2 and sewed out towards the end of I1, then followed the same steps within step 16 above to sew to the outer edge.  I then repeated it all again to sew from the middle of I2 (overlapping my stitches a little) to sew to the outer edge of I3.


19. Press your seams open - and you are done! - hopefully all your seams will have matched up happily.


You have finished Posy! - block 84 is done.


Remember that all the Farmer's Wife info is on Angie's blog - which is home base for the sew along.  The book you will need is The Farmer's Wife 1930s Sampler Quilt: Inspiring Letters from Farm Women of the Great Depression and 99 quilt blocks that honour them by Laurie Aaron Hird for Fons & Porter/F+W; RRP $28.99 (though it's currently on sale!) - click here to purchase.


Did you see that Angie sewed an alternate to Posy this week? - block 84a Ruth - using Marti Michell templates (to avoid sewing a FPP y-seam block) - so if you'd prefer to sew Ruth instead of Posy, please click on through.  Angie's post includes the links to Marti's chart + template info.

Angie's post also includes all the upcoming blog links for the remaining blocks - we'll be starting back again in the new year.

I hope you all have a very Merry Christmas, and a happy + relaxing holiday time with your family + friends.  All the best for a very peaceful, healthy + content 2017.  Thanks for stopping by xoxo cat


SaveSave

Tuesday, 27 September 2016

.: Farmer's Wife tutorial of sorts - block 87 Prudence :.


'Dear Prudence, won't you come out to play?' - so sang the Beatles.  Well, that's all very nice for the Beatles' Prudence.  Farmer's Wife Prudence, on the other hand, was not playing, smiling or looking beautiful when I sewed her up.  Prudence and I are not now, nor ever will be, friends. In the spirit of keeping things real, I am sharing my sewing struggles with you today, in the hope that you will have a much smoother piecing experience, and that Prudence does indeed come out to play, smile and look beautiful for you.

I foundation paper-pieced Prudence.  If you would like a FPP-tutorial, starting right at the beginning with printing out the paper templates, please take a look back at my tutorial for block 1, Addie (I was friends with Addie.  She was nice). I won't give particular FPP-how-to's here - but rather a 'things to watch out for with Prudence' guide - consequently, I'd suggest reading through all my post before you start, so you know what to watch out for, and where I digressed from the block's piecing order.

OK, let's get to it, Prudence.

1. First up is to choose your fabrics and colour in your block diagram.  So far, so easy.


2.  If you are so inclined, use the FPP templates to make plastic templates - they make fussy-cutting and directional-cutting much easier.


3. Work through all your template pieces and glue down the first fabric piece on each template, and then pin the second piece.  Digression from the template-order alert - if you are foundation paper-piecing, for E1/E2 and G1/G2, glue your outer-cross (blue) piece down as the first piece, then add the inner-cross (orange) piece.  Take care with seam-trimming - with FPP, you always fold the bigger number down onto the smaller number to trim your seams - but, if you follow my suggestion for this step, please be sure to fold the smaller number down onto the bigger number to trim your seam. In the pic below, you would fold G1 down onto G2 to trim, because you went backwards and started with G2 and then added G1.


4. Be aware that trimming the outer seams for some sections is a little annoying - you may need to use scissors to snip into the corners, if you don't trust your rotary-cutting accuracy/ability to stop in time.  See what I mean?


5. Digression from the template-order alert - if you are fussy-cutting the centre square A2, glue your A2 piece first (in the pic below, see how I've so-helpfully written '1' in pencil?), then sew A1 and then A3.  Be sure to trim your seams, folding A1 down onto A2 and then A3 down onto A2 - again, this is different from the usual seam-trimming process for FPP, where the bigger number is always folded down onto the smaller number.  Go carefully, as you don't want to trim off the fabric you just sewed on - that would be upsetting.


6. Y-seams.  There are several.  Just take a look at the pic below, for starters - what even is that!?  I am not skilled at sewing y-seams, so would like to draw your attention at this point to two very excellent Farmer's Wife y-seams tutorials. Melissa from Ms Midge did a great y-seam tutorial for block 13 Belle - please take a read - and Angie from GnomeAngel did an excellent y-seam tutorial - including a video! - for block 61 May.  It's definitely worth clicking through, as Melissa + Angie's tips are way better and ultimately more y-seam successful than mine.


As for my own y-seam thoughts - always sew the long seam first, from the outer edge to the inside.  When you get to your y-junction, put your needle down, pivot your block and keep going, slowly and as best you can.   I tend to only sew a few stitches, then remove the block from under the needle, and come in again towards the y-junction from the other outer edge. It's fiddly and slow, and your fingers can feel like huge cucumbers when you are manipulating such little pieces.


To be completely honest, I had a true shocker joining section I to section E - it's a very gradual y-seam.  It was at this point in the Prudence-piecing-process that I realised she has not been designed as a true FPP block.  There is no extra instruction given in the book, about the trickiness of joining these sections, other than "join I to E".  When pinning your sections together, be aware that the tip of the A4 triangle meets the very slight bend in F1 (see pics below).


When it comes to joining ABEFHI to ACDGJK, take your time.  Make a cup of tea. Read Melissa's + Angie's y-seams posts again. Start at the outer edges and sew towards the y-junctions.   Pivot.  Take your block out from under the needle and sew in again from the other outer edge. By the time you are done, you will have earned a Y-Seam Medal.


And that's Prudence.


I try to be positive and helpful in this space, but I also have to be honest.  Prudence was a really unenjoyable block to piece.  I have a lot of FPP experience, but I do tend to avoid y-seams when I can.  I had to unpick every section-joining seam at least once with Prudence, and still ended up with more wonk than I am happy with.  The bottom right square below the centre-rabbit isn't square, there's plenty of triangle-rippliness going on, and there are puckers-aplenty - but after two unpicks and re-sews of most section-joins, I was done.  Prudence is looking as good as she's going to - and I AM very happy with my fabric choices for her (I'm taking that as a win).

Another upside - who could even have guessed what a perfect choice that little centre rabbit was when I started - the expression on her face is perfect - she's totally saying "WHAT are you doing, I'm utterly dismayed by your inadequate Prudence-piecing, but I must endure in dignified silence. I will not smile or play".


Please, please do not be deterred by my experience - I shared my thoughts to try and help point out the tricky bits, rather than scare you off.  Take Prudence slowly, step by step, and you will end up with a very sweet block indeed and a Y-Seams Medal.  She will be worth it.

We have now finished the September Farmer's Wife blocks - there is just Kitty @ Night Quilter to go, on Thursday.  And Marti Michell will definitely have lots of tips for a happier Prudence-experience, using her wonderful templates as much as is possible. Be sure to check in again with Angie next Tuesday for the October Farmer's Wife block + blogger line-up.  

And last but not least, the book details - The Farmer's Wife 1930s Sampler Quilt: Inspiring Letters from Farm Women of the Great Depression and the 99 Quilt Blocks that Honour Them by Laurie Aaron Hird for Fons & Porter/F+W.


Happy sewing to you, whatever you are making today.  xoxo cat

Friday, 6 November 2015

.: Farmer's Wife Friday - week 6 :.

Quite the exciting Farmer's Wife week for me, since I shared my first tutorial as a Guest Blogger! 


As you can see, we had three blocks this week - number 1, Addie (I made two, since it was 'my' tutorial block), number 57, Margaret and number 62, Milly.

Every possible piece of information you would need to know about my Addie blocks is in my tutorial post, so I'll leave you to click through and read it if you would like to.


Margaret and Milly were released together, as they share a very similar block-construction, whether you choose to sew them with the Marti Michell templates and conversion charts, or by a more traditional HST method.  I used Marti's templates, as I had a little fussy-cutting to do for each of the blocks.  I finally had the perfect block for my long-stashed 'Margaret' fabric! 


And I don't have any 'Milly' fabric, but I DO have 'Amelia', thanks to Sarah Jane's gorgeous Out to Sea range.


If you'd like to learn a few tips and tricks for sewing Addie, Margaret and Milly, click through to read the tutorial posts by Angie and Kirsty.  And remember that each Sunday, Angie hosts a linky-party on her blog, so you can take a little time to click through and see all the gorgeous blocks everyone has been making this week:

Addie - Angie
Margaret - Angie + Kirsty
Milly - Angie + Kirsty

We've now sewn 15 blocks out of 99! - I wonder how many more we will sew by the end of the year. Hope you have a lovely weekend, whatever it is you are doing.  I'm really hoping to get to Finders' Keepers at some stage over the weekend, so I can make a big dent in my Christmas shopping.  xoxo cat

Wednesday, 4 November 2015

Farmer's Wife Sew-Along - Addie - foundation paper piecing tutorial

Hello and welcome to my first tutorial as a Guest Blogger for the Farmer's Wife 1930s Sampler Quilt Sew-along!  I'm Cat and I share this space with my great friend Vee - we design and print fabric, totes and t-shirts.  Thanks so much to Angie for hosting this awesome, ever-growing Sew-along; Fat Quarter Shop for its sponsorship; and Marti Michell and her team for their wonderful templates, conversion charts and support of all of us Farmer's Wife-rs.

My tutorial today is for sewing Addie as a squared foundation paper-pieced (FPP) block.  I've also sewn an on-point Addie, using Marti Michell's templates, and will share a hot tip with you about getting your fabric-placement correct when using the templates. 

As a FPP-disclosure - I've got quite a bit of FPP experience - I've sewn plenty of fabulous FPP designs, most often by Kristy from Quiet Play (who has a great FPP tutorial here) and Penny and Kerry from Sew-Ichigo (who have a great FPP tutorial here - they also have two great little tutorials for FPP y-seams, if you click through to their 'tutorials and tips' tab, you'll find them - you never know, there could be more y-seams in our Farmer's Wife future!).  Cass also shared two fabulous FPP tutorials here and here.

Addie is a great starter-block for FPP - each section is small, there are no tricky seams, and matching all the seams to join the sections together is a pretty straight-forward process.

OK, here we go - there are lots of photos, so you might like to pop to the kitchen and make a cup of tea to keep you company while you scroll.


Step 1 - choose your fabrics!  I've tried to stay true to the three-fabrics-only placement that Laurie has used in the book, but cheated a little, since I have an ongoing fussy-cutting obsession and couldn't pass up the chance to include something a little fun in the centre.  So - the centre blue Aunty Cookie is supposed to 'match' the blue sketch fabric. 


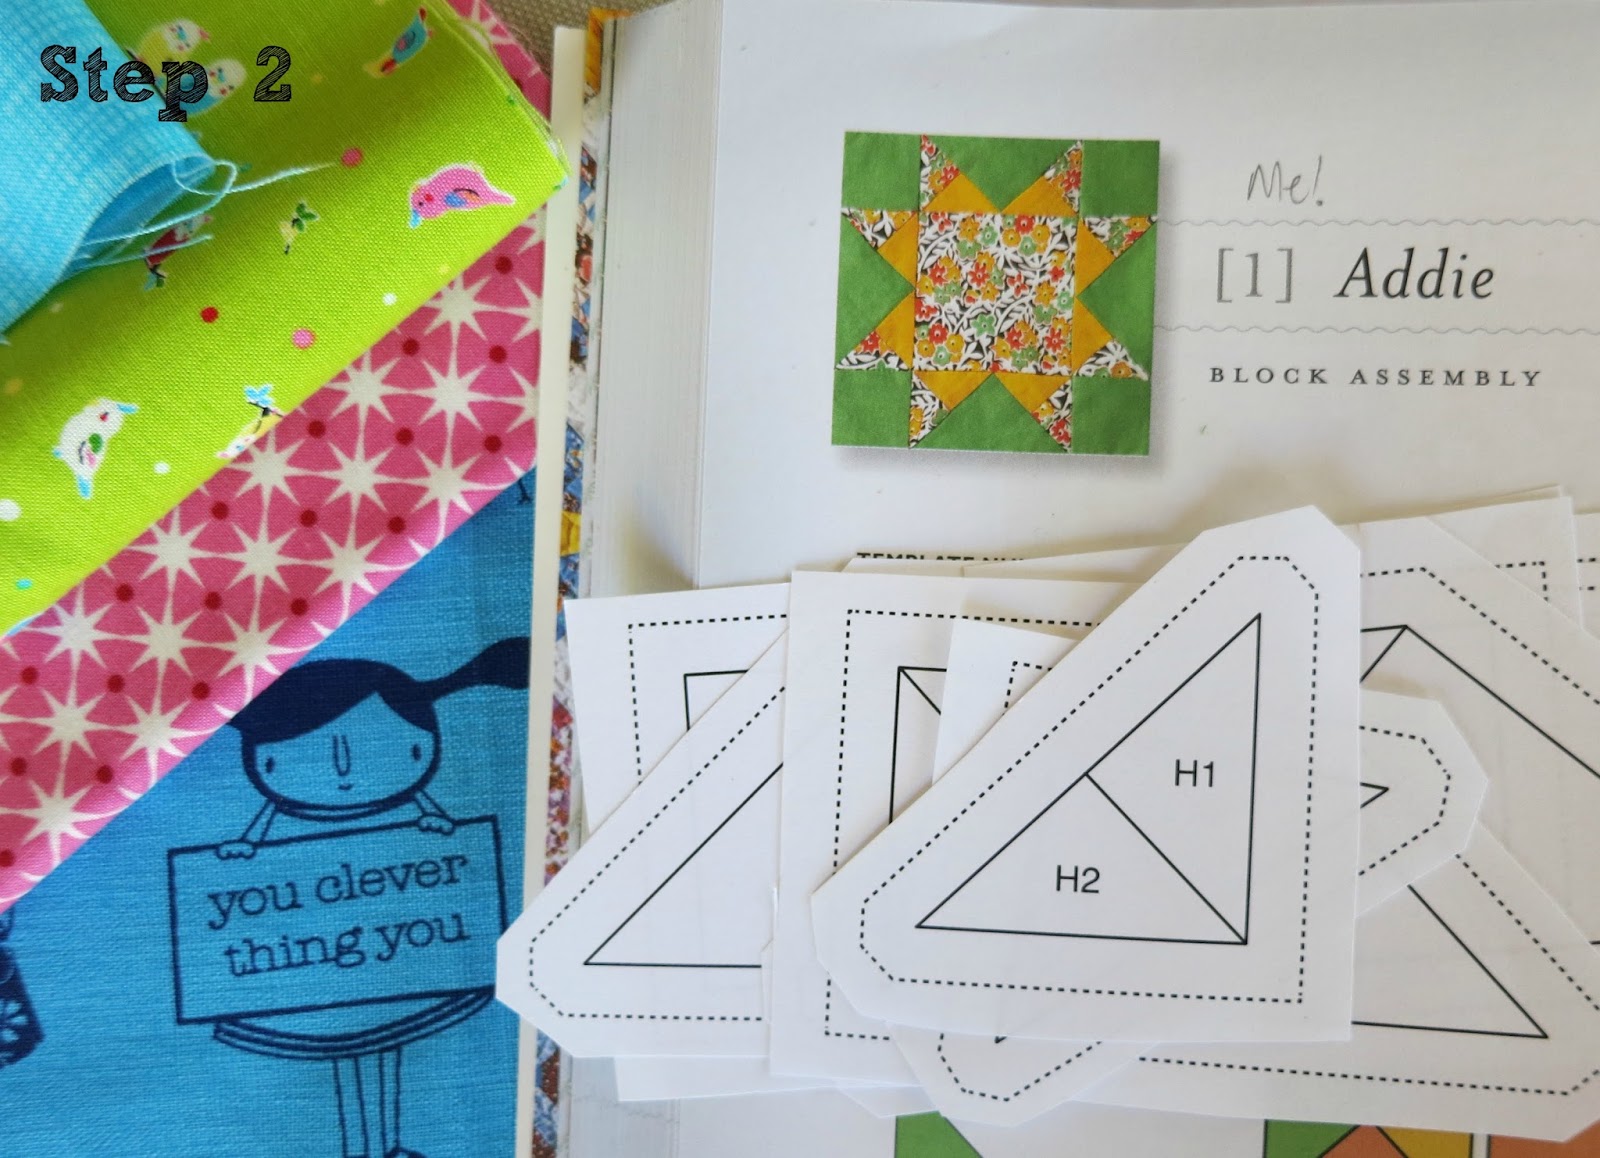
Step 2 - print off the FPP template for Addie from the CD, making sure that your printer is set to 100% (or whatever your printer's version of 100% is).  Cut out each lettered-section - A, B, C etc - allowing yourself a little wriggle-room beyond the outer dotted-line.  The solid line is your sewing-line, and the dotted-line is your seam-allowance. 


Step 3 - colour in each section, according to which fabric is going where.  It also helps to colour-in the block-assembly diagram that appears at the top of your printed templates - that's always my first colouring-in step, but I am unable to share that diagram with you here due to copyright.  Be sure that your coloured-in block-assembly diagram matches your coloured-in sections, so there are no unwelcome surprises once you've finished piecing.


Step 4 - using your Sewline glue pen (or your trusty glue-stick from your stationery supplies), make a quick swish of glue on the unprinted side of the paper behind the number 1 on each section (A1, B1, C1, etc) and place the paper, printed-side facing up, onto the wrong-side of your chosen fabric.  If you are using directional fabric, or a fussy-cut for this step, now would be the time to hold the paper up to the light to check that your placement is correct.  Make sure your fabric extends beyond the seam-allowance (dotted-line) along the edges, and at least 1/4" past any internal sew-lines. 


Step 5 - pin your second (H2 in this photo) piece in place.  Make sure your fabrics are right-sides together and that your second piece extends at least 1/4 inch beyond your sew-line.  And note that your second piece of fabric extends away from the numbered section that it's intended to cover.


Step 6 - once it's pinned in place, flip your second (H2) piece down, to make sure it will cover the relevant section AND the seam allowance. 


Step 7 - pile up all your glued and pinned sections and take them to the sewing machine, so you can do a spot of chain-piecing. 


Step 8 - turn your machine on and reduce your stitch-length to whatever is recommended for FPP on your machine.  I have a Bernina and always sew FPP patterns with a 1.5 stitch length. 


Step 9 - place your first section under your machine-foot, and drop the needle right into the starting point of your sew-line.  Start sewing slowly, back-stitching at the start and finish of your sew-line.  I use Bernina foot number 37 (the 1/4" foot) for FPP, as I like to see the needle as it sews along the sew-line, and exactly where the needle is as you come to the end of the sew-line. 


Step 10 - here's your finished sew-line, with back-stitching at the start and finish.  For all the internal sew-lines in a FPP pattern, I never stitch into the seam-allowance - others do, but my preference is to back-stitch at the start and finish of each sew-line and never sew beyond it into the seam allowance. 


Step 11 - fold your paper on the sew-line, giving it a little crease so it's ready to trim the seam-allowance.  In FPP, when you trim your seam-allowance, you always fold the bigger number down onto the smaller number - so in this photo, H2 is folding down onto H1.


Step 12 - with your paper folded down as described in Step 11, line your ruler up with the 1/4" line on the folded-edge of the paper, and trim your seam allowance to 1/4".  Make sure that all your just-sewn-fabrics are out of the way, and that no rogue pieces have flipped over - you don't want to be trimming them away with your seam-allowance, that's no fun.


Step 13A - with the fabric-side of your pieced section facing up, carefully flip over your second (H2) piece and iron it flat.   You may prefer to use a seam-roller at this point, rather than be back and forth to the iron - I certainly do this when I'm in a class - but at home, I prefer to move between cutting mat, iron and machine between each FPP chain-piecing session.  In the photo, you'll see that I've flipped and ironed-flat the blue H2 piece.  


Step 13B - once you have finished a section (i.e. once you have sewn all the numbers in order), you are ready to trim it.  Be sure to line your ruler up so that you are trimming 1/4" from the solid  external sew-lines of your section - this should exactly match up with the dotted-line anyway, but I always double-check and am guided by my ruler rather than just cutting on the dotted-line. 


Step 14 - once you have finished, ironed and trimmed all your sections, you are ready join them together.  I always lay out my block with the papers facing up, so it matches the block-assembly diagram.  It looks a little like a jigsaw puzzle.  It's best to then follow the piecing guide next to the block-assembly diagram - join A to B etc.   I always use pins to make sure I am matching the sections accurately - in this example, the red pins go straight through the corners of the external sew-line on B to join the external sew line on A.  Use as many pins as you need (and take a quick look now at Step 14A for an extra tip in doing this).  As it's not really possible to sew with pins sticking out everywhere, once I've matched the sew-lines between the sections as best I can, I secure the pieces with clips, ready to chain-piece.


Step 14A - I've added this photo in to show you tick-marks for joining sections, since adding tick-marks to your pattern pieces is a really helpful way of ensuring you are joining your sections accurately.  Wherever you have internal sew-lines that must meet up, just draw a little red (or any colour!) line on the sections you are about to join - you then have a little reminder to add a pin to that sew-line when you are pinning your sections together.  As I've added this photo after I finished taking my tutorial photos, please note that it's for a different block, that I've chosen to randomly sew, not for Addie - so just ignore the fabric and pattern-piece you can see - you only need to focus on the pins and tick-mark :-) 


Step 15 - as you join sections together, tear away the seam-allowance papers before ironing your seams.  I tend to iron my FPP section-seams open, but let's not open that particular can of worms - you can iron your seams in whatever way makes you happy and works best for you and the pattern. 


Step 16 - see, open! This photo shows you two sections joined together, trimmed, and the seam ironed open.  It would have been nice if I'd trimmed those threads for you, as they're looking a little messy!  Keep working through all your sections, following the joining-order specified by Laurie, until you are finished.


Here's my finished block from the back, showing that I do indeed iron my seams open AND to the side, depending on what I think works best for each seam.  I tend to iron my seams open quite a lot, as I do love a nice, flat block.  Whatever works best for you and your block is perfect. 


And here she is again, all finished and telling you how clever you are for finishing your FPP Addie!


I did promise you my second Addie, which I sewed on-point using the wonderful Marti Michell templates.  She's cute, right?  I love the 'Good Intentions' girl in the middle and thought I was being quietly hilarious by pairing her with Heather Ross fish, since fish don't have hair! I wanted to share my hot tip for fabric-placement using Marti's templates for Addie, so you don't do as I did.  


In the book, Addie's centre-square fabric is the same as the outer-star point fabric.  So my intention was to match Good Intention Girl's hair (in the centre square) with the Bonnie + Camille scallops (on the outer-star points).  But, hmmm, someone wasn't concentrating and didn't lay out their block before sewing everything together.  

So - if you are using the templates to piece your Addie, be sure to piece your outside star point fabric so they are on the bottom left and bottom right of your background triangle, not (as I have done in the photos below) on the inner left and right of the background triangle.  These next few photos are an example of what not to do if you are following the fabric-placement diagram in the book. 


See? - you don't want your outer-star points on the inside - you want them on the outside.


When you've finished your template-sewn Addie side units, you want your inside star points where my B+C scallops are below - it's at this point you can work out whether you've made a fabric-placement mistake or not - of course, I did not realise this at the time! 


For a wonderful Addie tutorial using Marti Michell's templates AND which shows how to get your fabric-placement correct, click through to Angie's post from yesterday.

Well we've reached the end, and I just have one more photo to share with you - thank goodness, since your cup of tea must be finished or getting cold by now! Here are my two Addie's together - it's pretty amazing how different they look, isn't it.  


All the information you need for the Sew-along can be found on Angie's blog, which I think of as 'home base' for us all. 

And here is the book that you need, should you like to join in with us:


As I mentioned already, the Sew-along is sponsored by Fat Quarter Shop - click through to go shopping and don't forget to use the code FQSFarmers for a 10% discount off your purchase before 30 November.


And one last reminder, Marti Michell's templates, blog posts and conversion charts have been just wonderful in this sew-along - I am only new to using Marti's templates but I am a total convert. 

Happy sewing!  I am looking forward to seeing all your Addie's - be sure to link up to Angie's blog on Sunday, or share your photos to the Addie album in the Facebook group.  There are two more block tutorials to come this week, so be sure to check out Angie's blog tomorrow and Kirsty's blog on Friday.  Thank you for stopping by, I hope you have found my tutorial and photos helpful to your Addie-sewing.  xoxo cat


Related Posts Plugin for WordPress, Blogger...